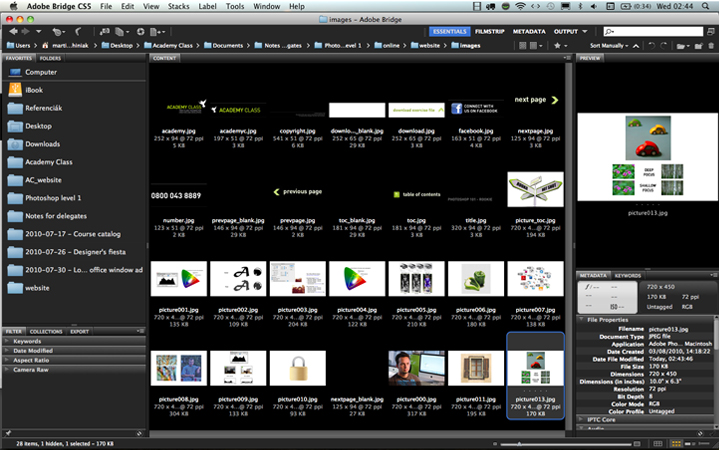
To work efficiently with image files it is highly recommended to start using Adobe Bridge, which is a side-car application of Photoshop made exactly to make working with images as easy and as convenient as it can be. Bridge is installed automatically with Adobe Creative Suite applications and you can start using it by clicking on the Br icon on the option bar or choose File / Browse in Bridge. We are going to use several devices when we work with digital images like digital cameras, scanners, monitors, printers etc and we need to know how to use them properly.
Parts of this series:
1. Digital Image Theory
2. Working with Bridge
3. User Interface
4. Making Selections
5. Tonal and Colour Adjustments
6. Working with Layers
7. Retouching Images
Why to use Bridge?
Bridge is similar to Windows Explorer or Apple Finder but has lots of features particularly for working with Adobe file types, starting and managing creative projects and saving your work in special formats like PDF contact sheets or Flash web galleries.
Most useful features
Using Bridge makes it faster and easier to locate your files and to use them in your creative projects. Bridge has several features but probably the most useful ones are:
– saving most used folders as favourites
– navigating between folders with the path bar
– see contents of all sub-folders at the same time
– filtering files (by type, orientation, date, size, etc.)
– labelling and rating files (making notes on them)
– preview to see full size with the loupe tool
– compare images in Filmstrip workspace
– fast full screen view (space key)
– Review mode (Ctrl/Cmd + B)
– adding keywords
– saving Collections
– using Smart Collections
– saving PDF contact sheets or Flash web galleries
Automated processes
You can use Bridge for batch processes like:
– batch renaming several files
– open several images into one Photoshop file
– resizing and/or converting several image files
To be continued soon…
Please don’t forget to comment
and follow the page on Facebook and on Twitter!


